
PAMPY’S
21-DAY KETOSIS REBOOT
What this is
Week 1
See it
Wear a CGM (Continuous Glucose Monitor) and eat normally. No dieting. No pretending. Just let the data show what food, booze, sleep and routine are doing.
Week 2
Reset it
Pampy’s Hard Reset Menu. Tight structure. Clear rules. Keep the CGM on and watch the metabolic shift happen.
Week 3
Hold it
No CGM. More lifestyle-friendly BP menu. Less strict, more realistic, still clean enough to protect the balance you created.
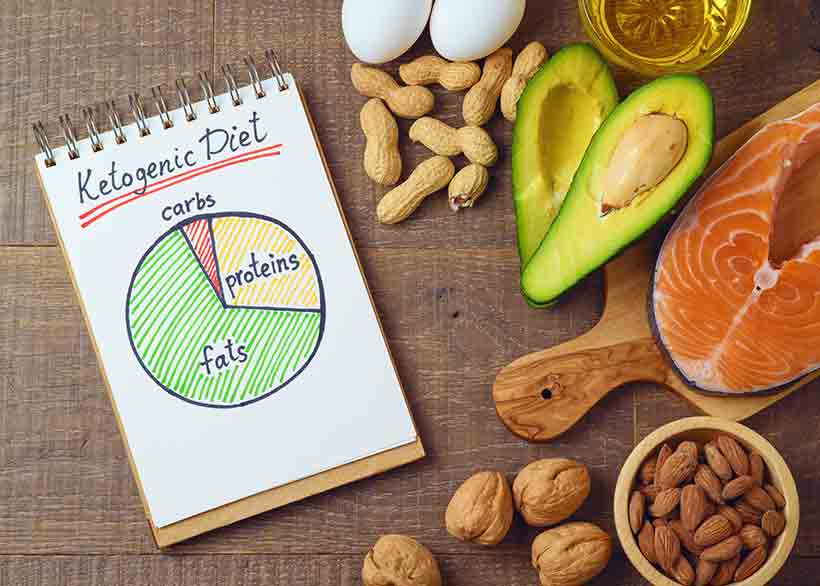
Why do it
Peel the fat you don’t need
Settle hunger. Flatten the chaos. Make stored body fat easier to access as fuel again.
Jack up brain and muscle energy
Less flatness. Better training rhythm. Cleaner mornings. More drive across the day.
Sleep for Australia
Better nights. Better recovery. Less of that half-cooked feeling hanging around all day.
How it works
Part 1 — 7 Days | CGM + eat what you want
The truth phase. No dieting. Just observe the data.
▾
Part 2 — 7 Days | CGM + Pampy’s Hard Reset Menu
The reset phase. Tight structure. Clear rules. Strong shift.
▾
Part 3 — 7 Days | No CGM + BP lifestyle-friendly menu
The hold phase. More realistic. Still balanced. Still deliberate.
▾
Part 1 — CGM Set-Up + Truth Week
READ THIS — Why we are using a CGM
- A CGM shows the truth fast. It can expose how your usual breakfast, arvo snack, beers, gels, takeaway, poor sleep or late dinner are really landing.
- It shows why fat loss can feel impossible. If you spend too much of the day riding glucose and insulin spikes, you are usually spending less of the day accessing stored fat effectively.
- It shows why appetite can feel irrational. Spikes and crashes often drive more hunger, more food seeking, and a stronger pull toward sweeter or easy-hit foods.
- It shows the effect of exercise and sleep. Good training often helps. Poor sleep often trashes the curve. The CGM lets people actually see this rather than just hear a lecture about it.
- It may be one of the best $100 spends you make. For many people, this is the first time they truly understand how their own body is responding — and that awareness can genuinely change the trajectory of their health.
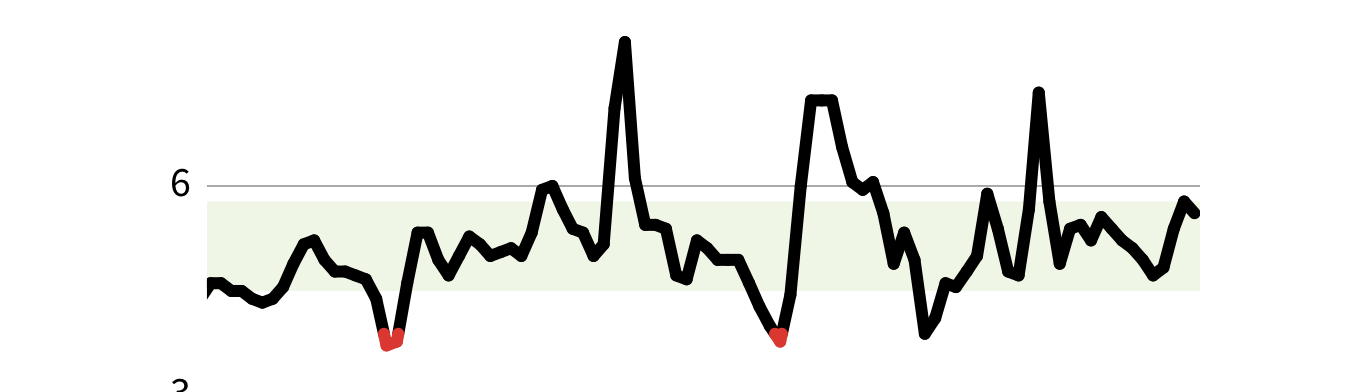
- We are chasing more time in the green zone. For this reboot, 4.5–5.5 mmol/L is our practical guide. It is not a perfect one-size-fits-all number, but for many people it reflects steadier fuel use and a better fat-adaptive metabolic rhythm.
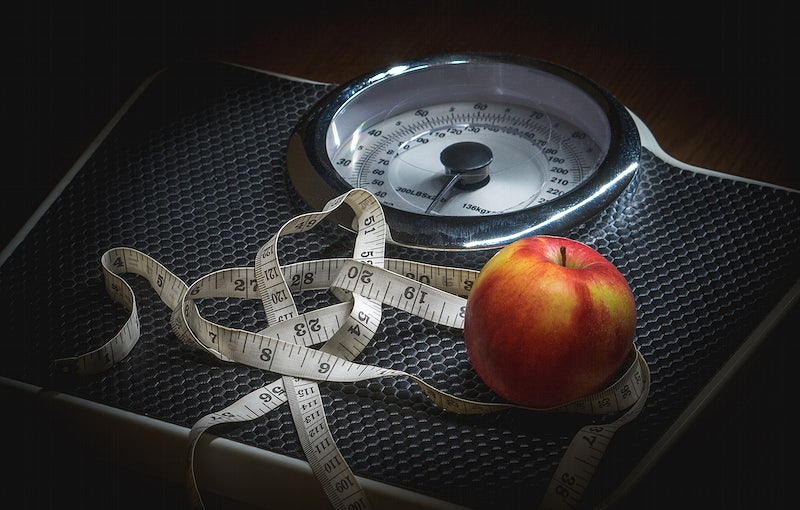
Before you start — Baseline Testing
Before applying the CGM, capture a quick snapshot of where you are right now. This gives us a clear before vs after comparison at the end of the reboot.
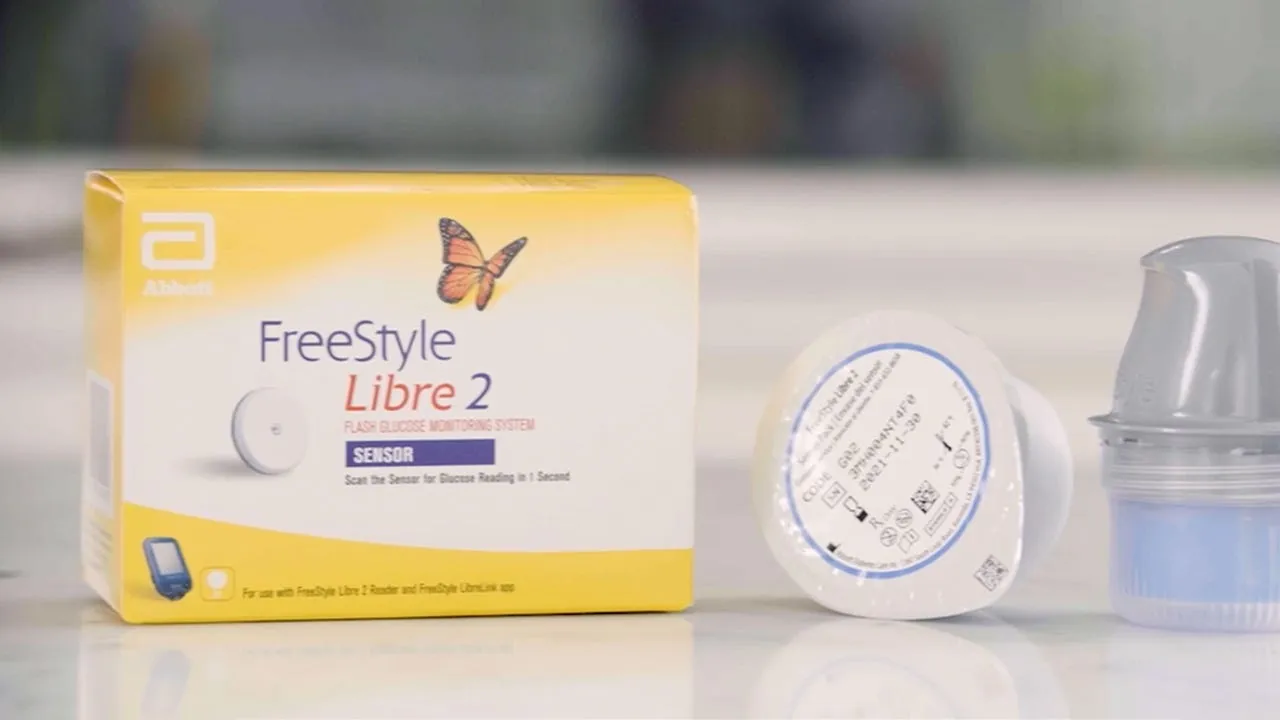
Buy it
Use the Freestyle Libre 2. Expect to pay about $100–105. In many cases, it could be the best $100 you ever spend on your health.
Set it up
Apply the sensor to the back of the upper arm, download the Libre app, scan the sensor, and allow it to warm up.
If the website asks why you are buying it, choose Other unless you are actually diabetic.
Live normally
This week you do not try to be good. Eat, drink and train exactly as normal so we can see the real curve of your life.
Step 1 — Order your CGM
Fast, simple, and worth doing properly.
▾
Step 2 — Apply the sensor + download the app
Back of the arm. Scan. Start learning.
▾
Clean skin
Choose the back of your upper arm. Clean and dry the area properly before application.
Apply sensor
Use the applicator as directed. It is quick, simple, and usually far less dramatic than people expect.
Download app
Install the Libre app, link the sensor, and let it warm up before trusting the numbers.
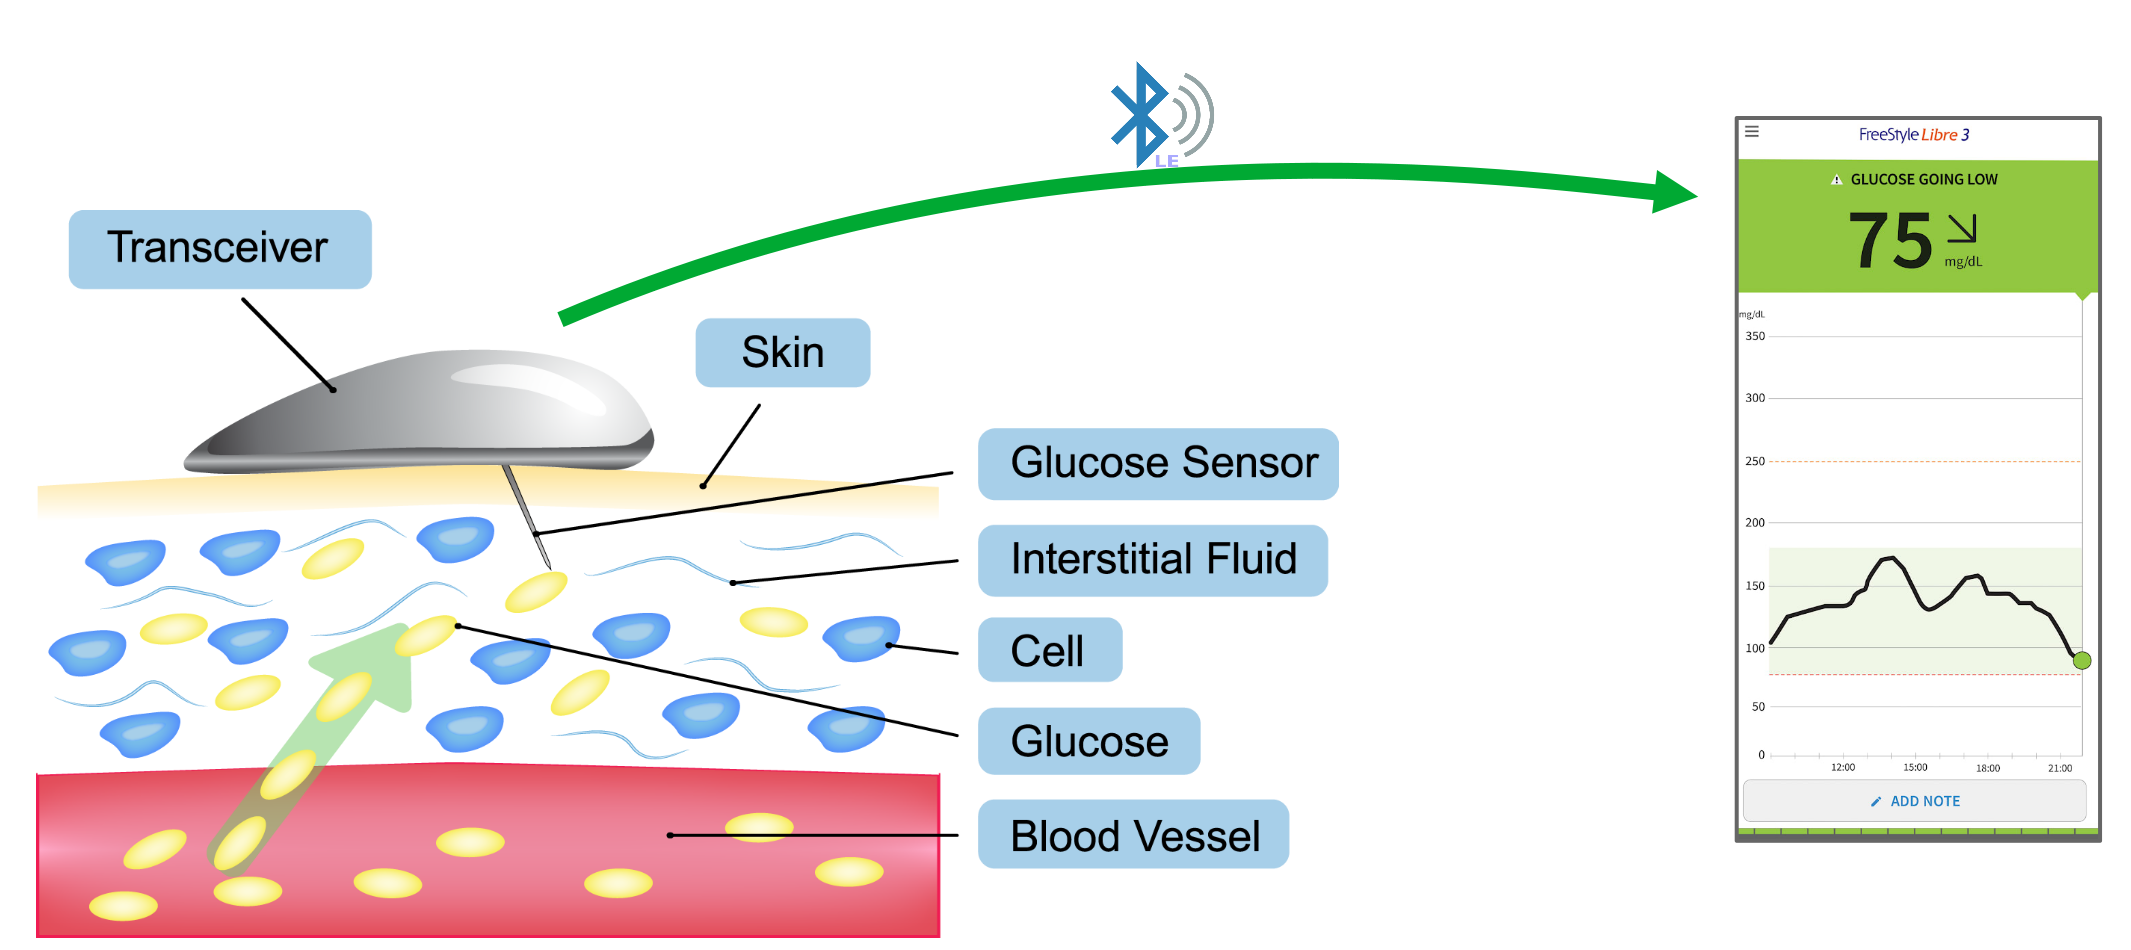
How the CGM works
The sensor measures glucose in the fluid under the skin. It is not exactly the same as a finger-prick blood test, but it is very useful for showing your daily pattern — the rises, drops, spikes, lulls, and overnight drift.
Set-up steps
Step-by-step sensor application.
▾
- Pick the spot first. Use the back of the upper arm — roughly the tricep area. Pick a spot that stays fairly flat and is less likely to get knocked. Avoid hairy areas if possible, and avoid scars, moles, stretch marks, lumps, and anywhere near an insulin injection site.
- Wash the skin. Wash the area with a plain, non-moisturising, fragrance-free soap. Do not use body lotion or cream on that area first, because oily residue can affect adhesion.
- Clean with alcohol. Wipe the site with an alcohol wipe.
- Let it dry fully. Let the skin air dry completely. Do not blow on it. This matters even more after a shower or swim.
- Open the sensor pack. Peel the lid off the sensor pack completely.
- Open the applicator. Unscrew the cap from the sensor applicator. You may hear a click. Do not put the cap back on.
- Match the marks and load it. Line up the dark mark on the applicator with the mark on the sensor pack. Then, on a hard flat surface, press the applicator firmly into the sensor pack until it comes to a stop. Lift it out — now the sensor is loaded and ready.
- Put the applicator on the arm. Place the applicator over the cleaned spot on the back of your upper arm. Keep your fingers clear of the blue panel. Do not push down until it is properly positioned on the skin.
- Push firmly to apply. Push the applicator down firmly until you hear a loud click. That applies the sensor.
- Cup it briefly, then remove applicator. Cup the sensor with your hand to help it stick properly, then gently remove the applicator from your arm.
- Check it’s stuck well. Make sure the sensor is attached firmly.
- Optional: add protective tape / over-bandage. If you want extra protection, use a medical-grade adhesive, bandage or tape over it. Do not cover the hole in the centre of the sensor.
Download app — exact instructions
How to link it, warm it up, and set reports properly.
▾
- Download the Libre app — available on both Apple and Android.
- Press “Link Sensor” and hold the top part of your phone up to the sensor. It is not using Bluetooth for this first connection. It should take about 1–3 seconds to connect.
- Warm-up begins. It will now take 60 minutes to warm up. The app shows you the time it will become active.
- Go to the three little lines in the top left-hand corner and go into settings.
- Check measurement units = mmol/L.
- Set report settings = 4.5 – 5.5 mmol/L. This is your green zone for the reboot.
- Set carbs = grams.
- Enter your account details — name, DOB, etc.
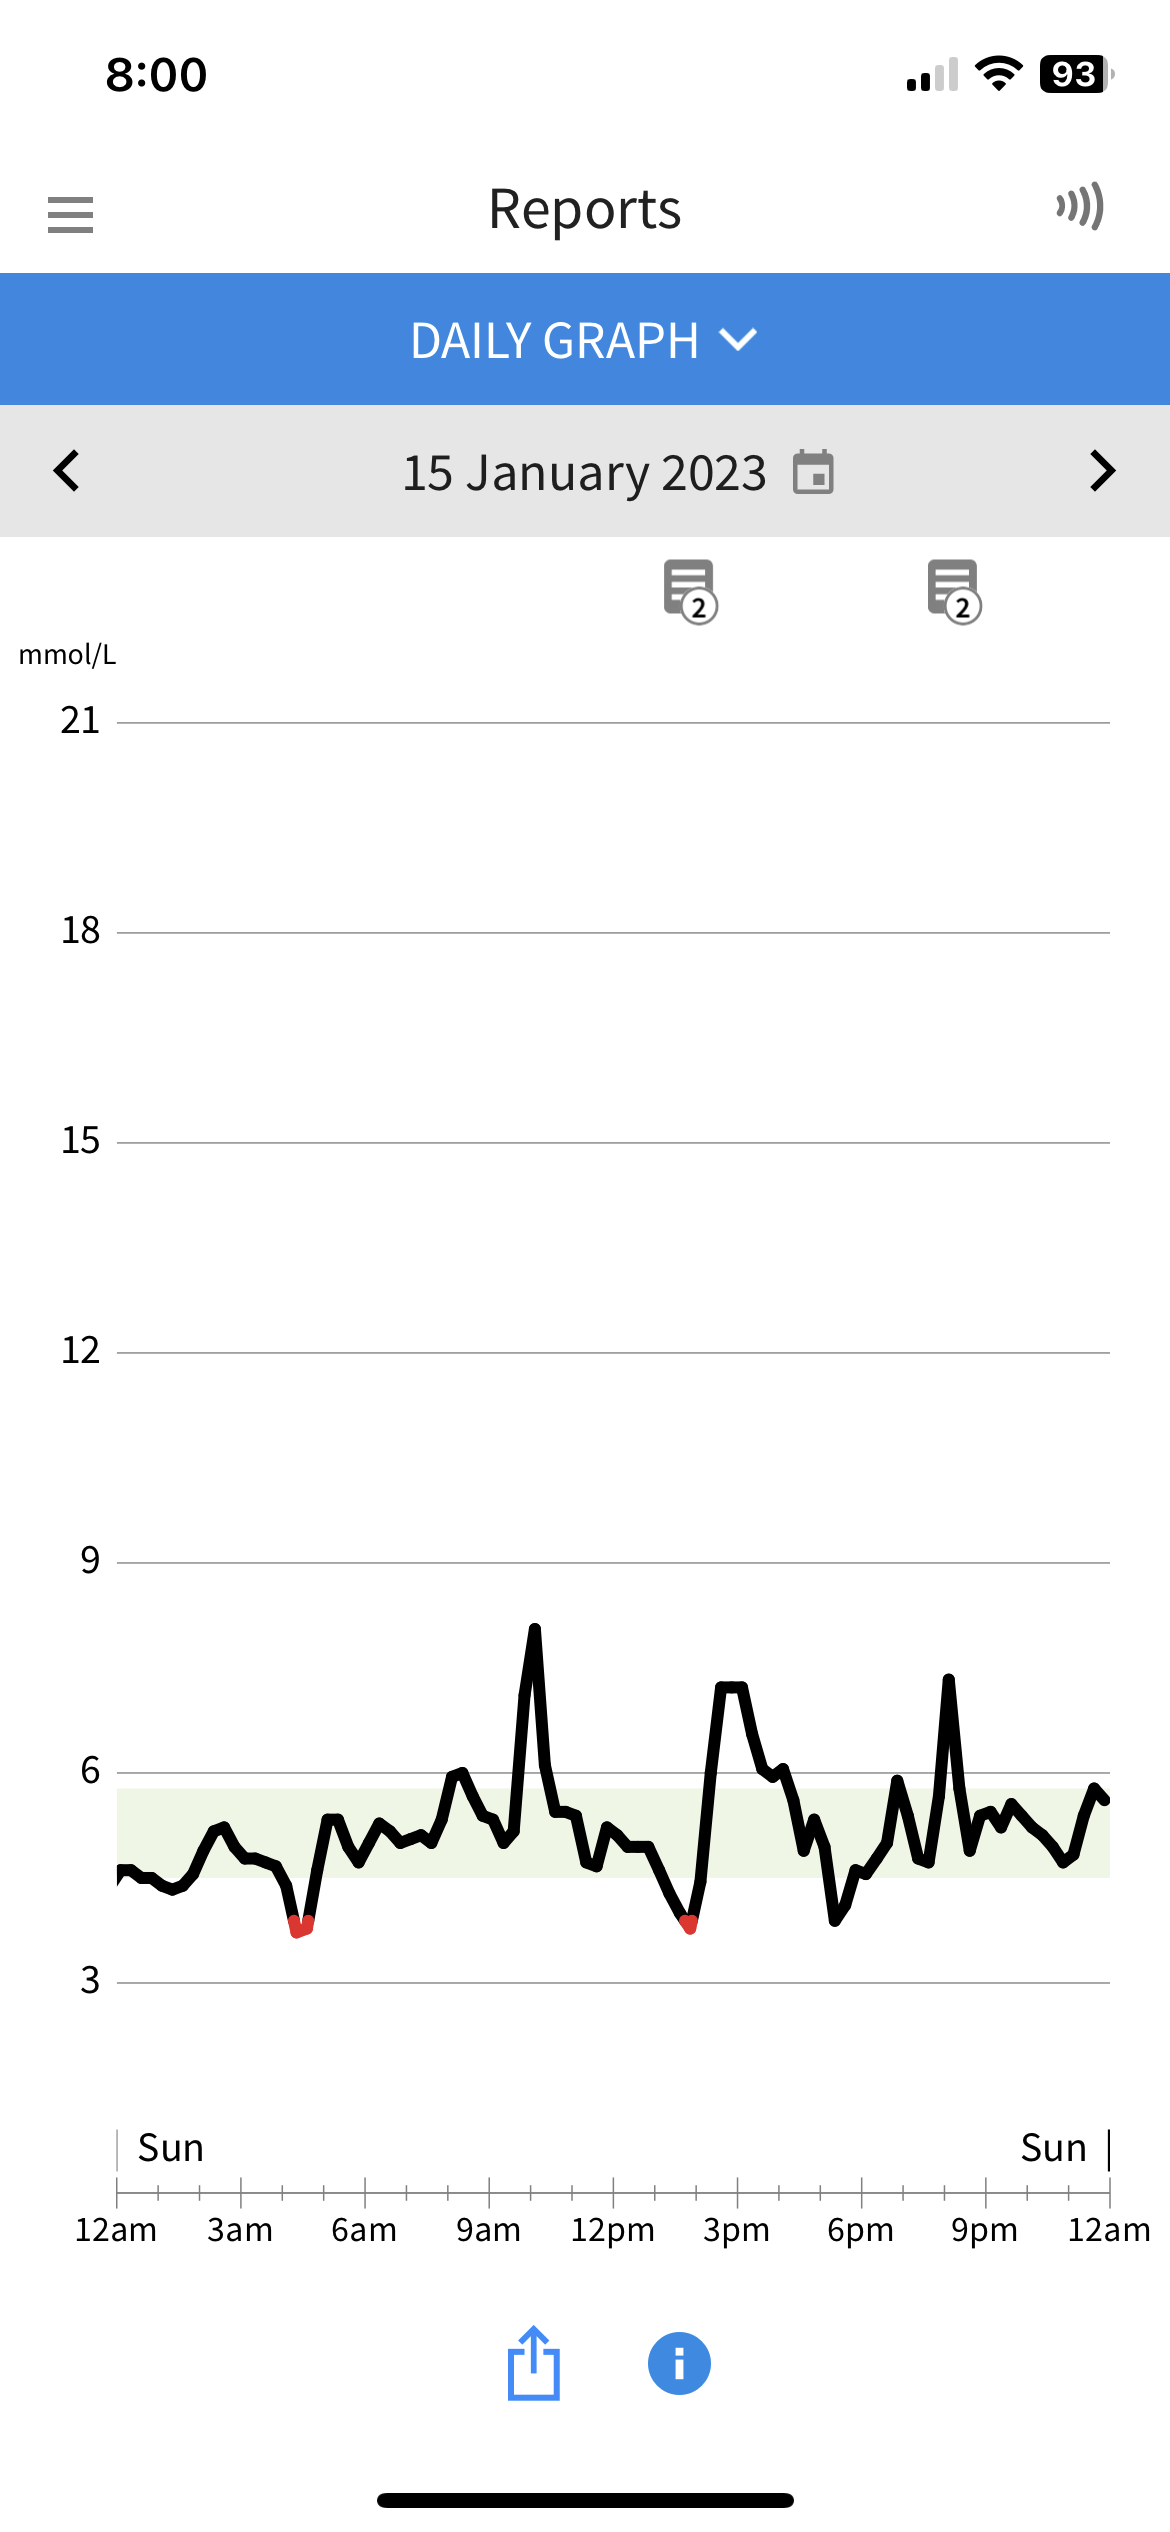
- Go back to the main settings and find DAILY GRAPH.
- Brad Pamp wants a screenshot of this page at roughly the same time each day.
Step 3 — Set your Green Zone
Simple target. Clear feedback.
▾
Set your app range to 4.5 – 5.5 mmol/L
This becomes your Green Zone. We often refer to it as the Ketosis Zone — not because everyone is in deep ketosis there, but because it is a very practical range where glucose is steadier and fat use is often better.
Step 4 — Live your normal week
This is the truth phase. Not the clean-up phase.
▾
Keep booze in
If alcohol is a normal part of your week, keep it in. We want to see the real curve.
Keep “sometimes foods” in
Fast food, desserts, coffee with sugar, sports nutrition products — if they are normal, leave them in.
Train normally
Do your usual training so we can see what hard sessions and recovery days actually do to the curve.
Step 5 — End-of-day task
One simple job. Every day.
▾
End of Day Task
Part 2 — Pampy’s Hard Reset Week
Why it works
Protein, fibre, hydration, reduced sugar drift, and repeatable meal structure work together to calm appetite and improve fuel stability.
Shop once
Get the key items in early so the week runs smoothly. Less choice. Less drift. Better compliance.
Tick the week
One tick per compliant day. Aim for 7/7. If you nail all seven, that’s your reset trophy week.
Why Brad Pamp uses this format
Short, structured, practical, and metabolically effective.
▾
Must-have shopping list
Open this on your phone and tick items as you shop.
▾
Hard Reset Shopping List
Tick off the must-have items first. Keep it simple and get the week done in one shop.
Why these items are in the reset
The logic behind creatine, bicarb, ACV and the rest.
▾
Your daily Hard Reset structure
Same rhythm each day. Less thinking. Better compliance.
▾
Morning
Creatine in water. Activity easy and rhythmic. Coffee mix: coffee + MCT + milk of choice, or tea / warm water if you prefer no MCT.
Midday
Fibre hit with psyllium or Metamucil. Then lunch: high fibre, protein rich, simple, contained and repeatable.
Afternoon + Night
Mid-arvo ACV swig. Dinner = big protein + big veg. Finish with a green closure drink.
Here’s exactly what to eat in Section 2
Simple step-by-step rhythm to follow each day.
▾
The exact Hard Reset flow
- Get up.
- 10g creatine.
- Train — whatever you normally do. If you don’t exercise, go for a 30-minute walk and throw in some simple crunches at the end.
- Coffee (milk of choice) + ½ tsp MCT oil.
- Mid-morning: fibre hit — psyllium husk or Metamucil in water.
- Midday lunch: one of the 4 lunch choices below, or something very close to them.
- Mid-arvo: swig of ACV.
- 7pm dinner: one of the 4 dinner options below — or simply clean protein + loads of veg with butter. No portion control. Eat to satiety.
- Green closure: any green drink from the health food section — for example, a Super Greens product.
- Brush your teeth immediately after finishing your green drink.
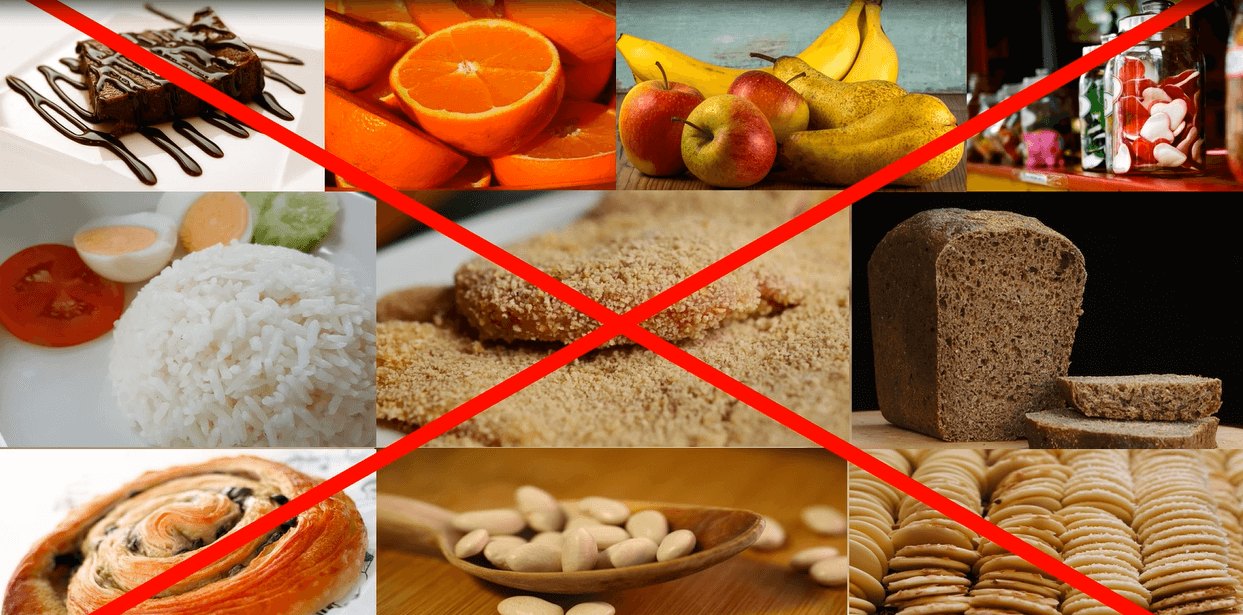
Lunch options — 4 hard keto classics
Make yourself. Contained. Easy to repeat.
▾
Egg + avo bowl
Boiled eggs, avocado, feta or cheese, spinach or rocket, olive oil, salt, pepper.
Tuna crunch salad
Tuna, avocado, cucumber, celery, leafy greens, olive oil, lemon, herbs, cheese if desired.
Omelette plate
3-egg omelette with cheese, mushrooms and spinach, plus side salad and avocado.
Chicken + cheese lettuce wraps
Cooked chicken, cheese, avocado, lettuce cups, mayo or olive oil dressing, cucumber and herbs.
Dinner options — 4 simple hard reset dinners
Big protein. Big veg. Easier prep.
▾
Steak + greens
Steak, big garden veg or steamed greens, butter, salt, cracked pepper, herbs.
Roast chicken plate
Chicken thighs or breast, broccoli, zucchini, salad leaves, olive oil or butter, herbs.
Salmon + veg
Salmon fillet, asparagus or green beans, leafy salad, butter, lemon, salt.
Beef mince pan
Beef mince cooked with zucchini, mushrooms, herbs and butter. Serve with leafy greens and cheese if wanted.
Daily Pampy check-in
30 seconds. Screenshot + quick self-check.
▾
Send this to Pampy each day
Screenshot your daily CGM curve and text it to Brad Pamp — 0412 487 034. Then enter your daily self-check below.
Track your 7-day compliance
One tick per day. Chase 7/7.
▾
7-Day Hard Reset Compliance
Part 3 — Lifestyle-Friendly Hold Week
Use your data
Look back at the patterns you saw on the CGM — what spiked you, what settled you, what meals held you in a better rhythm.
Design your own week
Use the lessons from the first two weeks to build a way of eating that is more realistic, but still metabolically smart.
Keep useful strategies
I strongly suggest keeping some of the better habits — MCT if it suits you, bicarb hydration, and the occasional arvo ACV swig.
Breakfast guidance
Only breakfast if you are actually pressing exercise in the morning.
▾
Breakfast option 1
Oats, berries, Greek yoghurt, and a little honey. A smart option if you’ve earned breakfast with proper morning exercise.
Breakfast option 2
Eggs, avocado, and sourdough. A steadier breakfast if you want something more savoury and sustaining.
No breakfast option
If you’re not training hard in the morning, coffee only is still a very reasonable play. Keep the TRE effect going.
Lunch options — gut-health and metabolically friendly
More open now, but still sensible.
▾
Egg / avo / sourdough
Eggs, avocado, greens, and one or two slices of quality sourdough. Simple, filling, and far more balanced than random takeaway.
Protein salad bowl
Chicken, tuna or salmon with leafy greens, olive oil, cucumber, herbs, and a side of sourdough if you want it.
Yoghurt / oats combo
Greek yoghurt, oats, berries, cinnamon, and seeds. Good gut-health option if portions stay sensible.
Example lifestyle-friendly fuelling day
Same structure, just more realistic and sustainable.
▾
Morning
Coffee or tea. If training strongly, choose one of the two breakfast options. If not, continue the TRE effect.
Lunch
Choose a gut-health and metabolically friendly lunch with sensible carbs, protein, colour, and fibre.
Afternoon + dinner
Keep some of the good plays: bicarb hydration, the occasional arvo ACV swig, and simple protein + veg-based dinners.
Final self-test
Same scores as Part 1 and Part 2.
▾
Final self-test score
Record your end-of-program numbers so you can compare them against where you started.
Any questions for Pampy?
Email Brad directly.
▾
Need help?
If you’ve got questions about your results, fuelling, training, or how to hold the gains, send Pampy a note.
✉️ Email Brad Pamp
1. “I eat well” — but the graph says otherwise
8 out of 10 people believe their nutrition is solid.
Yet their CGM shows:
- Frequent spikes well above the “green zone” (4.5–5.5 mmol/L)
- Readings jumping into 7–10+ mmol/L after everyday meals
- Even “healthy foods” triggering big responses
👉 Think oats, fruit, wraps, smoothies, rice, muesli bars.
Reality:
Healthy doesn’t always mean metabolically stable.
2. Carb sensitivity is higher than expected
After years of higher-carb intake, many people become:
- More insulin reactive
- More glucose sensitive
So now:
- Smaller amounts of carbs = bigger spikes
- Spikes last longer than expected
👉 It’s not that carbs are “bad”
👉 It’s that your system has lost flexibility
3. The spike → crash cycle (this is the big one)
This is where people go: “Ahhh… that’s me.”
You’ll often see:
- Spike after eating
- Followed by a drop 1–3 hours later
- Then:
- Hunger kicks in
- Energy dips
- Cravings rise
👉 This is the rollercoaster
👉 And it’s why people feel flat despite “eating well”
4. Morning glucose rises… without food
Common surprise.
Before training or even getting out of bed:
- Blood glucose rises on its own
Why?
- Cortisol + adrenaline
- The body preparing for activity (“fuel up, we’re moving”)
👉 This is normal
👉 But often exaggerated in metabolically stressed systems
5. Stress = sugar spike (even without food)
Big one people don’t expect.
You’ll see spikes:
- Before work
- During meetings
- When under pressure
That’s:
- Cortisol pulling glucose into the bloodstream
👉 No food required
👉 Just stress
6. Training too hard = higher glucose, not lower
This catches people out.
Hard sessions often show:
- Elevated glucose during and after training
Why?
- Body perceives stress → releases glucose for fuel
👉 Especially common in:
- Deconditioned individuals
- Overtrained individuals
- Poor sleepers
7. Late-night eating wrecks the overnight line
Evening meals (especially carbs + alcohol) lead to:
- Elevated overnight glucose
- Poor recovery patterns
- Disrupted sleep cycles
👉 The CGM often shows this clear as day
8. Alcohol hits harder than expected
People are often shocked by:
- Big spikes OR unstable swings after alcohol
- Poor overnight control
- Next-day variability
👉 It’s not just calories — it’s metabolic disruption
9. The “flat line” is rare at first
Most people don’t sit steady.
Instead they see:
- Peaks
- Drops
- Variability
👉 And that variability = metabolic stress
What It All Means (The Big Takeaway)
At a simple level:
The flatter and more stable your glucose line,
the more likely you are to be using fat as your primary fuel source.
When that happens, people typically report:
- More stable energy
- Clearer thinking
- Better appetite control
- Easier weight management
- Improved sleep
- Lower inflammation
No calorie counting.
No obsession.
Just better fuel selection and timing.
What We’re Moving Toward (Weeks 2–3)
The goal isn’t perfection.
It’s progress toward:
- Fewer spikes
- Smaller spikes
- Faster recovery
- More time in the green zone
👉 That’s where metabolic flexibility starts to return
👉 That’s where healthy ketosis begins to show up
Simple Pampy Summary
Week 1 is not about being perfect.
It’s about seeing the truth.
Most people don’t have a food problem…
They have a fuel system problem.
And once you see it —
you can fix it.
Overview
Week 2 is where we deliberately go hard.
This is not forever.
This is a forced metabolic reset.
We’re deliberately shifting your system away from glucose dependence → toward fat adaptation.
Why We’re Doing This (Top Benefits)
- Improve fat oxidation (burning stored body fat)
- Reduce insulin demand
- Flatten glucose variability
- Improve metabolic flexibility
- Stabilise appetite hormones
- Reduce cravings
- Improve mental clarity
- Lower inflammation
- Improve energy stability
- Reset your relationship with food
What You’ll Likely Experience
1. Appetite drops (big time)
By day 3–5, most people notice:
- Less hunger
- Smaller meals feel enough
- Sometimes forgetting to eat
2. Exercise may feel flat (days 3–5)
Your usual glucose fuel is gone.
Fat conversion hasn’t fully kicked in yet.
- Performance dips
- Effort feels harder
- You may “hit the wall”
3. Thirst increases
Lower carbs = lower stored glycogen = lower stored water.
- You’ll lose water quickly
- Electrolytes drop
4. Sleep changes
- You may need less sleep
- You may wake earlier
- Sleep may feel lighter
This is often a sign your energy system is shifting.
5. Weight drops quickly
Days 4–7 often show scale movement.
Important:
- Some fat loss
- A LOT of water loss
6. Brain fog → then clarity
- Early: sluggish, foggy
- Later: sharper, more focused
This is the transition to ketone use.
7. Mood swings (short term)
- Irritable
- Flat
- Short fuse
8. “Keto breath”
Common sign of ketosis starting.
- Slight metallic or fruity breath
9. Cravings spike… then disappear
Days 2–4 can be rough:
- Sugar cravings
- Snack urges
Push through → they drop dramatically.
Pampy Summary
Week 2 is not about comfort.
It’s about forcing change.
You’re teaching your body a new fuel system.
Ride the dip → and you come out the other side far more stable.
Overview
Week 3 is where it all starts to feel… normal again.
But not your old normal.
A better one.
What’s Changing
1. Food choices become automatic
You’re no longer battling yourself.
- You naturally choose better foods
- Portion control improves without thinking
- You stop eating when you’ve had enough
This is the big shift — behaviour, not discipline.
2. Sugar loses its pull
If you committed to Week 2 properly:
- Processed sugars become far less appealing
- You may even find them too sweet
3. Hunger becomes “clean”
- You feel true hunger — not cravings
- No urgency or panic to eat
- No constant snacking drive
Your appetite system has reset.
4. Energy becomes steady
- No big dips
- No afternoon crashes
- No reliance on quick fixes
You’re now running more off fat-based energy.
5. Training returns to form
- Strength returns
- Endurance improves
- Effort feels smoother again
Often with better consistency than before.

6. Sleep stabilises
- Deeper sleep
- Better wake patterns
- Less overnight disturbance
7. You become your own coach (this is key)
Now comes the important bit.
What about carbs?
If you truly feel you need them — eat them.
Then observe:
- Do you bloat?
- Do you feel sluggish?
- Does your energy dip?
- Does your weight jump?
What Most People Realise
- They don’t need as much food as they thought
- They don’t need constant carbs
- They feel better when glucose is stable
- They perform better with controlled fuel intake
Pampy Wrap
Week 3 is about ownership.
You’ve seen the data.
You’ve felt the shift.
Now you decide how you want to run your system.
No rules.
No extremes.
Just awareness — and better choices.